How to Repair Canvas Paintings Dec 30 TERRY ROWA Blog, Painting Smart, Save Monet, Restoration and Conservation Restoring, or Repairing a canvas painting can be very rewarding because at the end of your project you will have transformed a brower-beaten painting that was destined for the trash-bin into its original beautiful self. Here we will share some detail of canvas repair discussion with the principles involved in fixing a torn or broken piece of artwork.
Understanding the Damage
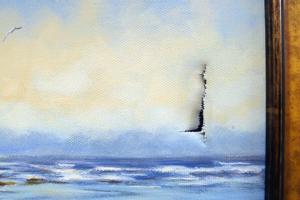
First of all, you should find out the seriousness of the damage before you can start actual repairs. Reasons are many for why the Doc Martens starts to rip; smaller tears can usually be mended by you at home, but if it is a bigger damage, then it requires professional restoration. One of the big questions during an assessment is your choice (toilet repair, water heater restoration, or whatever else).
Materials Needed
An Artist And The Canvas PaintingA Substantial Piece Of NewsprintMasking Tape Masking Tape Is A StaplesOrganic-Straight-Box KnifeSolvent Such As Mineral Spirits
There is some spare canvas: cut it to at least an inch larger than the rip.
A white craft glue or PVA (Polyvinyl acetate) is recommended in order to protect the canvas; iCode GLUE FOR THE ACIDS
Decide onto the patch, scissors
Level work surface, clean and stable
Weights (to weigh down the patch as it dries)
Step-by-Step Repair Process
Cutting the Patch:
A piece of extra canvas extends at least an inch beyond the tear on all sides. This should provide enough material to securely adhere the corresponding undamaged areas of the painting12.canvas repair (ad)
Preparing the Canvas:
Steal a flat surface that has been cleaned and set the painting face down. This would allow easier access to the back of the canvas where the patch will be need a fixed2.
Applying Glue:
Apply acid-free glue generously on one side of your patch. Make sure to apply it evenly (no bubbles, no gaps during adhesion)
Positioning the Patch:
Lay the patch directly over the damaged section so that it covers the tear entirely. Use a patch large enough to have 2.5 cm (1 inch) of patch extending beyond tear on all four sides 22 For optimal adhesion, press with some force between patch and original canvas23
Securing and Drying:
Lay a flat board or something heavy over the patch until it dries. Give the glue time to dry according to manufacturer’s instructions — usually several hours, or overnight14.
Finishing Touches:
Once dry, inspect the repair. Use the gesso to smooth over any rough patches if needed, and paint escrima in a matching color (lightly sponging over with a damp sea sponge) back into these sections; 23
Additional Considerations
For more serious damage, visit a professional conservator who is trained in art restoration.
This will save your canvas painting from any further damage in the future.
If you take the effort to follow these steps then you will have your art work restored in no time and keep it in shape for years to come.