How to Get Out of the Automatic Repair Loop?Fixing Automatic Repair Loop in Windows 8There are a few steps that you can follow if you have been encountering an ‘Automatic repair loop’ and do not want your entire platform reinstalled. Here’s a comprehensive guide:
Boot from Installation Media:
Boot your computer from Windows 8 installation DVD or USB drive and click on “Next”.
Enter any key when prompted to boot from the media.
Access Repair Options:
Choose your keyboard layout.
Click Repair your computer on Install screen.
Click on Troubleshoot >
Advanced options.
Startup Settings:
Find Startup Settings, and select Restart.
Choose an option to boot into Safe mode after the restart of PC by tapping F4 button (you can tap appropriate key)
Command Prompt Solutions:
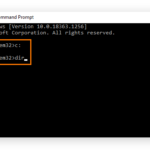
If not, go back to the Advanced options menu again and select Command Prompt instead. Commands you can run here:
To disable automatic repair:
bashbcdedit /set {default} recoveryenabled Non
To check disk integrity:
bashchkdsk /r C:
The process to Rebuild the Boot Configuration Data (BCD)
bashbootrec /fixmbr
bootrec /fixboot
bootrec /rebuildbcd
System Restore:
If still having problems, you have to choose System Restore from the Advanced options again and it will restore your current version of Windows back in time.Automatic Repair (ad)
Reset or Refresh Your PC:
If none of these solutions help out, it would be a good idea to use the Reset this PC option that reinstalls Windows but might remove your personal files based on which method you will opt for.
This is how users can fix the problems with Automatic Repair loop in Windows 8. Back up important data before continuing to resets or repairs.